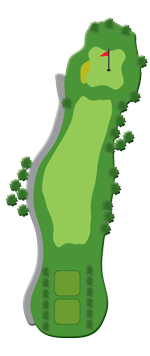
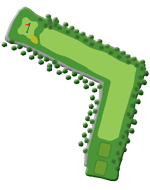
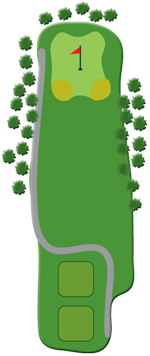
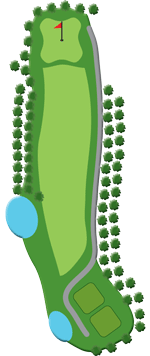
A straightforward, slight dog leg right opening hole with plenty of fairway. Keep the ball on the left handside for a short pitch to the green. For the big hitters this green can be reached with a long drive.
Tip: Beware when there is a back pin placement as the green slopes front to back. A second shot played too long can easily roll off the back of the green.
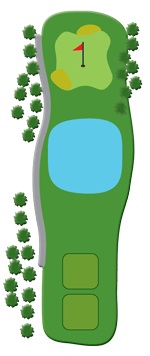
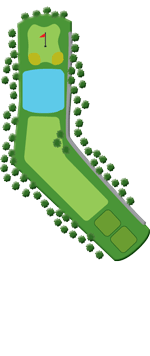
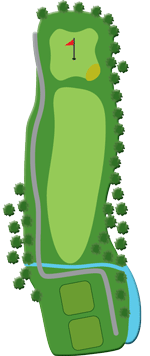
HOLE #2 – Par 4 – SI 3
Blue 400. White 380. Yellow 352. Red 340
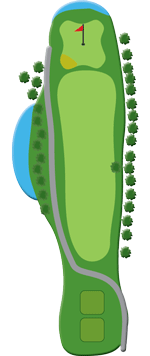
A medium length hole requiring an accurate tee shot. Ideally the drive should favor the middle right side. A shot hit too far left will require a tricky second shot into the green.
Tip: Beware the water over the green.
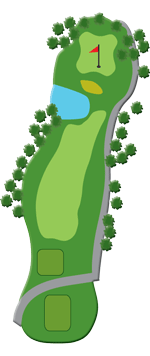
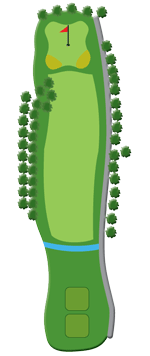
HOLE #3 – Par 3 – SI 11
Blue 155. White 130. Yellow 105. Red 96
The first of our par 3s is a relatively straightforward hole with one bunker on the left which is deep and will test your sand shots should you be unfortunate enough to land in there.
Tip: Green is downhill from the back so always try and stay under the flag for an uphill putt.
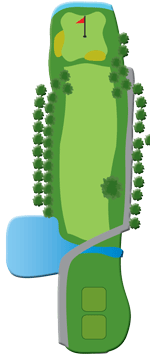
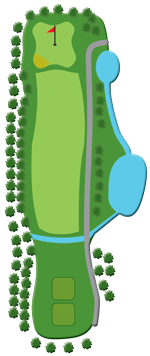
HOLE #4 – Par 4 – SI 5
Blue 368. White 356. Yellow 285. Red 277
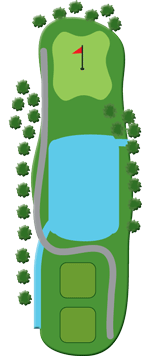
The fourth hole requires a very accurate tee shot. The hole slopes downhill and towards the water. It is 240 yards to reach from the white tees. Keep tee shot on the right side to ensure a short iron to the green. There are no bunkers around the green.
Tip: Tee shot requires a gentle fade away from the water to set up a birdie scoring opportunity.
HOLE #5 – Par 5 – SI 7
Blue 484. White 469. Yellow 421. Red 414
Don’t be fooled by the length of this par 5. It requires two very accurate and long shots to reach in two. The smart play is a long iron, hybrid or 5 wood with a gentle draw to get around the corner to set up a 200 yard plus second to the green.
Tip: If you are laying up with your second shot, keep it to the left as the fairway slopes towards the right hand trees.
HOLE #6 – Par 4 – SI 1
Blue 412. White 391. Yellow 345. Red 267
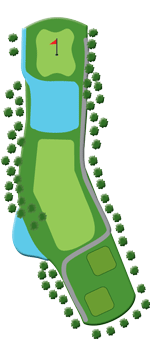
The toughest hole on the course with water all around and out of bounds over the creek on the left. Ideal drive would be right side. This will still leave you with a long to medium iron second over the water.
Tip: Beware the sucker pin position left and front. Middle of the green is always a good second shot.
HOLE #7 – Par 5 – SI 9
Blue 510. White 467. Yellow 420. Red 410.
It’s birdie time! Plenty of fairway on this hole with the only trouble being left. For the long hitters a good drive left of center leaves a fairway wood or a long iron approach to set up a birdie.
Tip: Beware the trees to the right of the tee as these can come into play should you be contemplating a big draw for your tee shot.
HOLE #8 – Par 3 – SI 15
Blue 149. White 131. Yellow 90. Red 80.
The shortest of the par 3s. Be careful when the pin is on the back as a tee shot over the green may land you in trouble.
Tip: Aim for the pin. This is a birdie hole.
HOLE #9 – Par 4 – SI 13
Blue 391. White 362. Yellow 275. Red 266.
The final hole on the front side is a fairly straight par 4. Make sure you take one club extra for the second shot as the green is uphill from the fairway and a short shot may not reach the green.
Tip: Careful with your putting here as this green is fast downhill. Get yourself a cold beer from the clubhouse as you pass on the way to the tenth tee.
HOLE #10 – Par 3 – SI 16
Blue 168. White 158. Yellow 145. Red 137.
An uphill par three that requires an accurate tee shot to miss the two bunkers either side of the green. The green has a slight slope from left to right, so the general rule is to aim left of the flag when putting.
Tip: Be careful of going over the back with your tee shot as the ball can run away towards the 11th tee if hit too hard.
HOLE #11 – Par 4 – SI 4
Blue 382. White 366. Yellow 313. Red 305.
A tough par four, the eleventh hole requires an accurate tee shot avoiding the trees on the right. You are then left with a mid to short iron over the water to a downhill green. Be carfefull not to over club here and land over the green.
Tip: Play smart here as par is a good score.
HOLE #12 – Par 4 – SI 14
Blue 352. White 334. Yellow 285. Red 277.
Keeping the tee shot center left on this hole leaves a straightforward short iron to the green. Avoiding the bunkers on the left and the right should set up a birdie chance.
Tip: Shoot for the flag, it’s birdie time.
HOLE #13 – Par 4 – SI 12
Blue 393. White 370. Yellow 340. Red 311.
The key to the 13th is keeping the tee shot on the fairway. Any shot right can land into big trouble as a water hazard can catch a wayward drive.
Tip: The green slopes left to right so always allow plenty of break when putting.
HOLE #14 – Par 4 – SI 10
Blue 396. White 380. Yellow 329. Red 323.
A slight dog leg right requires an accurate drive to avoid the trees on the left and right.
Tip: A good tee shot here will leave a short iron to a fairly flat green. It’s birdie time.
HOLE #15 – Par 4 – SI 2
Blue 422. White 412. Yellow 353. Red 341.
The longest of the par 4s. A long dirve is required here to give yourself a chance to get on in two. Beware a pull here as water awaits the wayward shot.
Tip: Fairway, green and two putts is a great score here.
HOLE #16 – Par 3 – SI 8
Blue 175. White 157. Yellow 134. Red 118.
The longest of the par 3s is a considerabley test. It’s all uphill and the green slopes back to front.
Tip: Try and keep your tee shot under the hole otherwise a three putt beckons.
HOLE #17 – Par 5 – SI 18
Blue 469. White 453. Yellow 400. Red 393.
The extended Par 5 requiring a good drive that will set up a second shot across the water for an eagle putt. Beware the new bunker on the right.
Tip: A long drive across the left corner is the perfect tee shot here.
HOLE #18 – Par 4 – SI 6
Blue 381. White 354. Yellow 309. Red 297.
The final hole on the course requires a gentle fade to the left center of the fairway to leave a mid to short iron into the green.
Tip: The second shot into the green should be kept left of the flag as the green slopes left to right and the ball is generally carried that way. A shot too far right will inevitably end in the bunker.